FLASH
04/10/2011
Today we where shown the basics of using flash by Marnie and we created an animation.
We where shown how to use the line tool to create the out line of the robot photograph that we got off of Google ( search engine ).To create a curve in the line or to change where the beginning and the end of the line is.
You hover over the line and hold the Ctrl button and it gives you the option of changing that line whatever way you wish so that we knew that if we needed a curved line we where able to change it to needs be.
We then used the fill tool to fill the top of the head of the robot and changed it to look more 3D with the gradient tool.
To create a sense of shade and reflection.
We turned the robot that we created into a symbol by pressing short-cut F8.
We created an animation and made the light flicker when we pressed play.
The way we did so was by creating some formof extension to the eye and filling it green.
After we did so we made sure that we made sure that it was
the layer with the eye that is selected.
We then selected slide three and pressed F6 then we selected slide two and pressedF7 we did the same again but we selected slide five
and pressed F6 then we selected four and pressed F7.
We did the same with the side of the robot that we created with the line tool.
We selected the layer with the robot that wedrew and selected the fifth slide and pressed F6.. This was
so that the robot still appears when the light in his eyes start to flicker.
When we played this back on Flash by pressing Ctrl + Enter the eye of the robot flashed three times.
We also experimented with motion tween and created some shapes to move in different directions using the motion path.
11/10/2011

Today we are working on our Motion Shape Tweens.
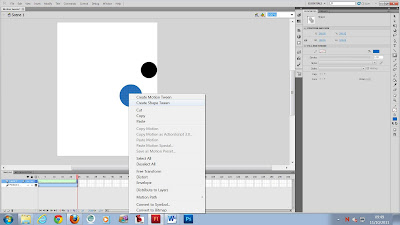
First of all we created a shape .. Mine being a Pink Square I clicked on slide 25 and pressed F7. On that slide across the screen I made a Blue Circle, right click the circle and selected "Create Shape Tween".

 A Shape Morphing into Text. The way we did this was by creating a new layer and drawing an oval shape as you see in the image it is the the left side of the image and it is pink. Then clicking on a different slide ( Slide 25 ) and pressing F6. Then in slide 25 creating some text of a different colour and of a reasonably large size so that the transformation is around the same size. The text is still not an image though so you have to click modify at the top of the screen and Click on Break apart. This will separate the letter and make them become individual but we want to break it apart again. So we click Modify > Break apart, Again.
Creating a leg for my robot. I created a new layer above the body of the robot and hid the layer containing the white square so that I could see the photo image that I started off with in the first place. I then used the line tool to follow the line of the image to create the leg to look identical to the starting image.

Today we are working on our Motion Shape Tweens.
First of all we created a shape .. Mine being a Pink Square I clicked on slide 25 and pressed F7. On that slide across the screen I made a Blue Circle, right click the circle and selected "Create Shape Tween".

 A Shape Morphing into Text. The way we did this was by creating a new layer and drawing an oval shape as you see in the image it is the the left side of the image and it is pink. Then clicking on a different slide ( Slide 25 ) and pressing F6. Then in slide 25 creating some text of a different colour and of a reasonably large size so that the transformation is around the same size. The text is still not an image though so you have to click modify at the top of the screen and Click on Break apart. This will separate the letter and make them become individual but we want to break it apart again. So we click Modify > Break apart, Again.
Creating a leg for my robot. I created a new layer above the body of the robot and hid the

To create the two legs as a motion tween to look like they are swinging like real legs.
 I changed the rotation point in the leg to the top of the leg so that when I rotated the image the leg would swing. I then went to slide 25 and pressed F6. on slide 25 I copied the leg and made it to swing the opposite way. In between the two slides I right-clicked and selected Classic tween.


No comments:
Post a Comment